Showing posts with label DIY. Show all posts

Saturday, May 24, 2014

Bright Yellow Kitchen Chairs

I did this refinishing project last fall but am just now getting around to documenting.  I decided it was time to pass along the old kitchen set that my parents had kept for years to my sister (who needed a table), and time for me to do something new! 

Before our big move I bought some vintage chairs with great potential.  They had upholstered seats (which I swore never to get as kids would destroy them), and wobbled quite a bit.  I loved the finish actually, but I knew I needed to add some screws for stability, and on half the chairs the finish was flaking.  So do I go safe and re-stain or bold?

 Bold of course!  I was refinishing the chairs in my parent's garage and after getting a coat of the sunny yellow on my mom casually asked me if I meant it to be so bright (probably thinking--eek!).  Yes I did mean it.  I love bright yellow.

After a lot of brainstorming I decided to try adding a thin baltic birch plywood to the upholstery frame.  I roughly cut out the seat shapes, used some wood clue and clamps to affix wood to the frame, and then used upholstery tacks to secure it in place.  Then I used a router to get the edges flush and pretty.

I am no carpenter but they turned out just as I hoped (quirky and bright).  I left them unfinished as I decided what to do, and then decided to leave them unfinished for fun.  I do wish I had put a clear acrylic on the wood to protect it from stains, I plan to go back and do that someday.

I still enjoy my silly sunny chairs.

DIY Fabric Napkins

I officially have two weeks left until my due date, consequently I've made a massive mental list of projects I would like to do.

One pressing item on my list:  fabric napkins.  Because that is what you need when a newborn is on it's way.  Just kidding.  My oldest has hit a phase where she hates being messy or having a drip of water on her while eating, as well my toddler is too cool for bibs but is a pretty messy eater.  We were going through a lot of paper and cloth towels at meal times.  I wanted something more fun than worn out dish towels and that we could reuse more systematically.

I'm sure it has been done before, but I decided to make my cloth napkins out of flour sack cloth.  They are my favorite towel to have around for drying and covering baked goods.  I grabbed a pack of four at the store and chopped each towel into quarters.  I rolled one edge over twice and stitched, then on the last raw edge I made some colorful bias tape out of fabric scraps (I love yellow in the kitchen!).  At the last minute I decided to add some twill tape so I could hang them if I wanted.

Each family member gets one at meal times and afterwards if it's clean we hang it up to use next time.  As a result of my adorable napkins I now want to build a skinny buffet table for our kitchen (I have the supplies, just need some tools) to house said napkins, cookbooks, and other kitchen things.  Also I want to make an ottoman.  And an over-sized wax canvas bag (wax is in the mail!).  Don't try to follow the thought process of a full-term pregnant woman, we do ridiculous things.

Thursday, April 24, 2014

Handmade Teepee

We don't have much going on in our backyard and I wanted to have something fun for the girls to play with this summer.  There are a number of tutorials out there, but I remembered seeing this teepee tutorial years ago.  Like most everything I do, I used her pattern as a starting point and then changed it.

I wanted each section to be equal (rather than have a big opening like Rachel's version), so I cut my panels about 44 inches wide tapered to 5 inches wide at the top.  I thought a round opening would be fun so I just went for it.

I cut a few inches off the wood due to necessity (I may have wedged the teepee against our ceiling...).

I didn't want to sand the wood, but didn't want to hear about splinters all summer.  So I decided to use strips from a vintage sheet I had lying around to hold the wood in place.  I was a little short on the length needed so I added a strip to the bottom of the teepee as well.

I haven't pulled it outside yet, but so far the girls seem to like it and I think it's totally cute and girly. Hopefully hours of fun will be had in this girly teepee this summer.

Big Black Apple Dolls

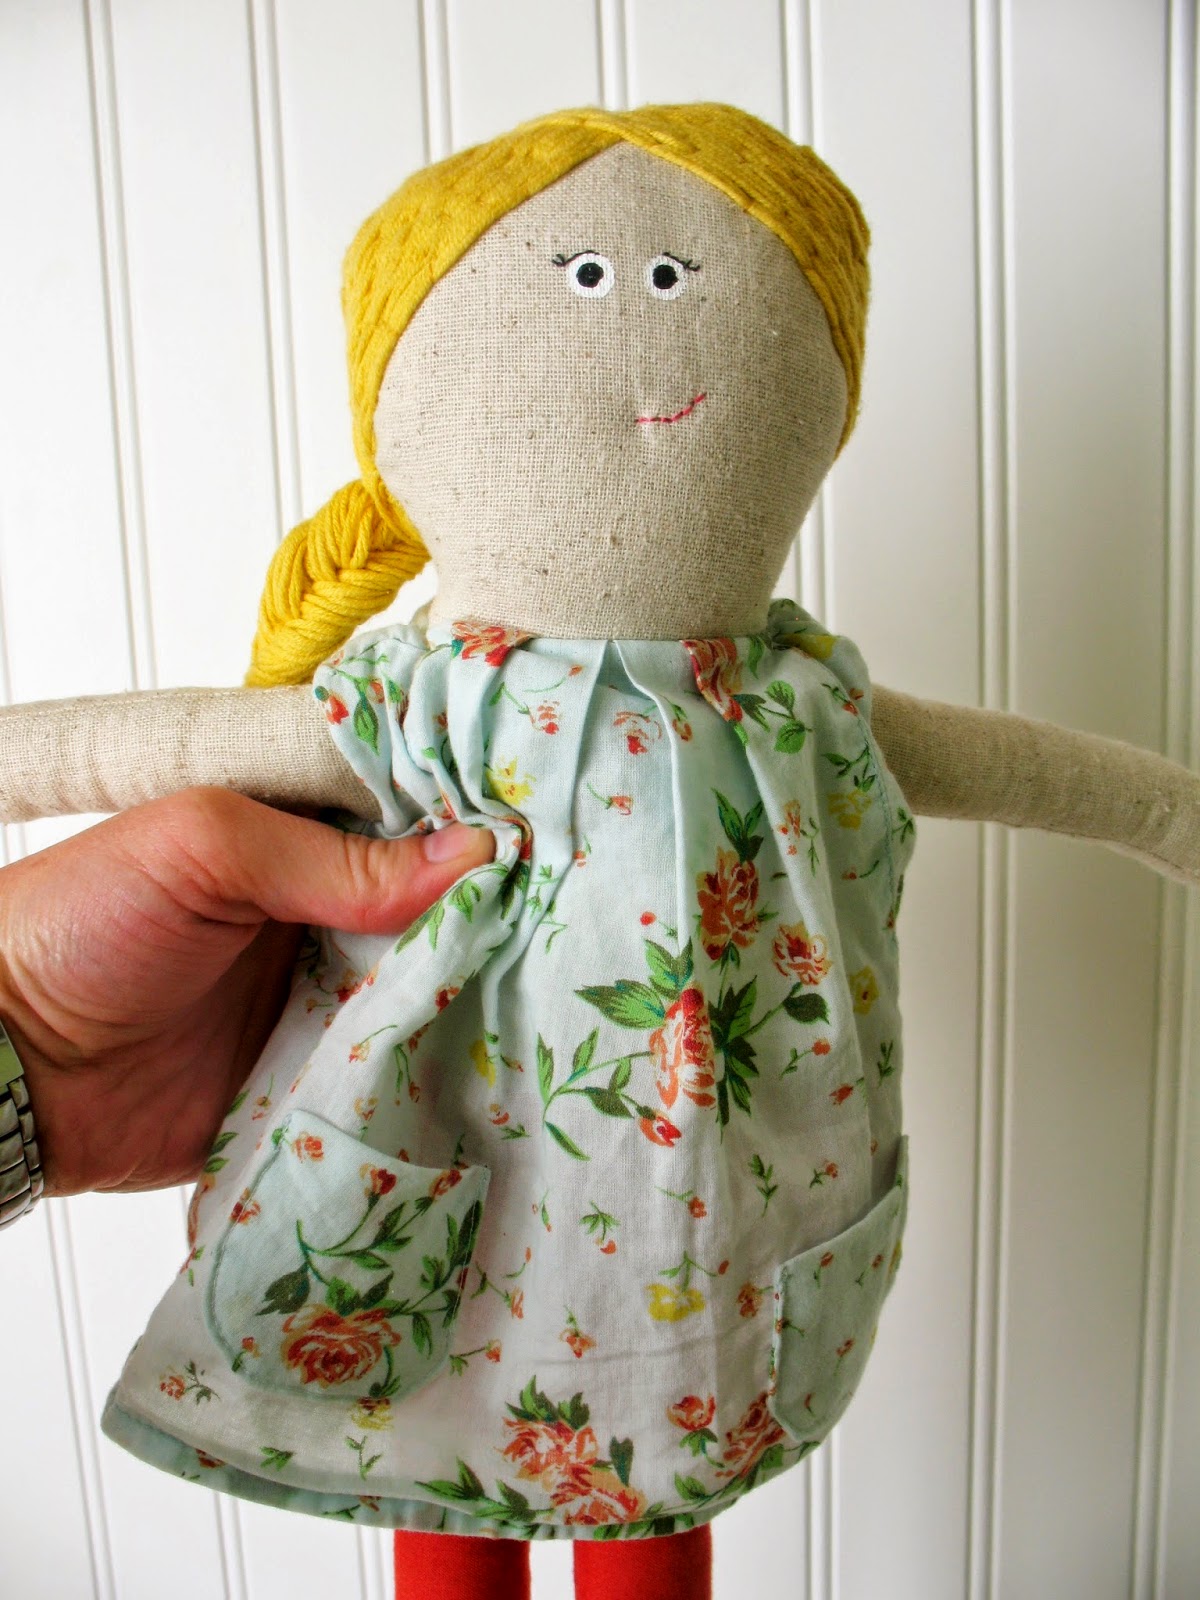
I love trying to make something homemade for my girls for their birthdays.  This year I decided it would be fun to make them a doll.  I've always thought the Black Apple Doll was adorable, and have sewn a few in the past.  This time I wanted to make them a little more special.  I enlarged the pattern to give me a starting point and then got creative with the rest.

I'm totally in love.  Way more than the girls love them, but isn't that how it always is?

I stressed about the face and left it for last on both dolls.  That was silly to do.  What if I had messed up after I had finished the whole thing? 

I painted the eyes on and then stitched the eye lashes and mouth on.

The hair took forever.  My girls are young and I knew I needed to adhere the hair on pretty well.  So I stitched every piece of yarn on to the head.  I used pins to sort of weave the yarn on the head and then I tacked everything down.  I found the technique/idea here.

The peach doll has tiny suede moccasins..Ack!  I die over them.  My oldest doesn't like to wear shoes so I thought it would be fun to leave her doll barefoot.

Saturday, January 18, 2014

Coat Rack

As with any new space, we soon discovered that the coat closet was not in the ideal place.  Most of the time coats were littering the floor in the kitchen or draped on couches.
  

After much online pursuing (and a good sale going on) I decided on these hooks .  They only went to three, but I wanted five hooks.  So I decided to get all 'no.1' hooks.  Who wants to be 'no.2' anyway?  I think I will re-number them in the future, but for now I think it's funny.

This should have been an easy project, but I ran into a few silly things (I highly suggest buying your own screws, the ones provided were poor quality). It's not a real project unless you've been to the hardware store more than once right?  Despite the setbacks, I'm glad to have somewhere to hang my coats!

Friday, October 25, 2013

An Arthur Halloween

This year I decided it would be fun to dress the girls as Ellie's favorite book series by Marc Brown, Arthur.

Initially I wanted Ellie to be Arthur and Ivy to be D.W., but opinions came out and we switched.  An Arthur costume for Ivy and a D.W. costume for Ellie.  I found the outfits and made some aardvark ears for each.  I may make a pair for myself and Corey to wear on Halloween-we'll be Mr. and Mrs. Read.
Quick homemade costumes are always great.  We spent a fun morning out at a Halloween festival, great time to sport our costumes a little early.

This spring Corey graduated and we spent a busy summer with family planning for a wedding.  We're now in our own space and I'll be playing catch up on missed projects soon.

Wednesday, April 24, 2013

DIY Play Kitchen

Here is the butcher block top play kitchen I made for my two girls' birthdays:

I had fun making this.  I wanted a smaller cabinet, but this is the best one that I found.  The tall cabinet door is the fridge.  Other than paint and two knobs, I reused or thrifted most things for the kitchen.  I did buy the dish set off etsy.  The plates and bowls are mini (maybe they were a dessert set?).  I've seen way too many cute princess dish sets turn bad once kids get them wet and rip the stickers off. 

My old kitchen cart had seen better days (and the drawer was falling to pieces), so I took the butcher block top, hardware, and scraps to help put this together.  I borrowed a jig saw from a friend to cut the sink and oven.

I love the oven.

I may steal these salt and pepper shakers from them.  They are hard, so if they don't play soft with them I will snatch them back happily!

Having their birthdays so close has it's perks.  I think every few years I may find a fun present to make them to share.

P.S. If you were at a loss when Google Reader announced it was going away like I was check out Bloglovin.  It's pretty similar to Reader. Follow my blog with Bloglovin

Wednesday, February 22, 2012

Letterpress Spice Rack

I've been going back and forth with what I wanted to do with my spices recently.  I really wanted to figure out a way to do a test tube spice rack (you know, geek chic?)--but when it came down to the details it just wasn't very practical.  Perhaps someday I'll get some test tubes (they are so cool!) anyway for to keep liquid extracts (vanilla, almond, etc).  

A month or so I pinned this.  It's unusual, but fun!  I had some leftover birthday present funds and decided to go for it.  As usual Corey was perplexed, yet not surprised, that I would want a dirty old drawer for my birthday :)  He's used to my odd choices now.

Here's my (half full) version:

It was difficult finding a tray that was wide enough to hold the spice tins I purchased.  I eventually found one that was priced okay and went for it.  I was hoping for a deeper tray, but worked with what I had (below you can see how they stick out quite a bit).

Strong magnets and strong glue was a quick fix!  

Another deviation from the original idea was I purchased some fun yellow washi tape to label the spices.  I liked this because it added some color and it's easily removable if I want to change things up.


Tuesday, August 23, 2011

Homemade Play Dough

Today I decided it would be fun to make something with and for Ellie--play dough! 

I plopped Ellie in the sling so she could help pour the ingredients into the pot and help hold the spoon while I stirred.  I used this dough recipe (cutting the recipe in half) and was happy with the result.  Nice silky smooth dough that doesn't turn your hands as dry as a regular salt dough recipe.  It's pretty close to regular Play-Doh minus the smell (which many dislike, but I oddly like).

I loved how sunny the yellow turned out.  Once Ellie gets a hang of playing with dough I think we will have to make a few more batches so we have color options!

Friday, August 19, 2011

DIY Magnetic Pin Holder

Many moons ago I lent out my cheap magnet pin holder to someone when they were working on a sewing project and never got it back.  While I wasn't attached to that particular holder, I did miss the convenience of it.

Months ago I stumbled across a simple magnetic pin holder tutorial and made a mental note.  I never did find a dish that I liked that much, but I did run across two miniature enambled cast iron skillets.  


Lightbulb.  An even easier DIY Magnetic Pin Holder.

You will need a metal dish of some kind, magnets (I prefer the stronger small ones), and pins.  Unless desired, no glue is needed.  If you don't use glue whatever you choose to use can be used for something else later.  First step:  put magnets in dish.
Second (and last) step: add some pins and bon appetit!
Side tangent I love Julia Child!